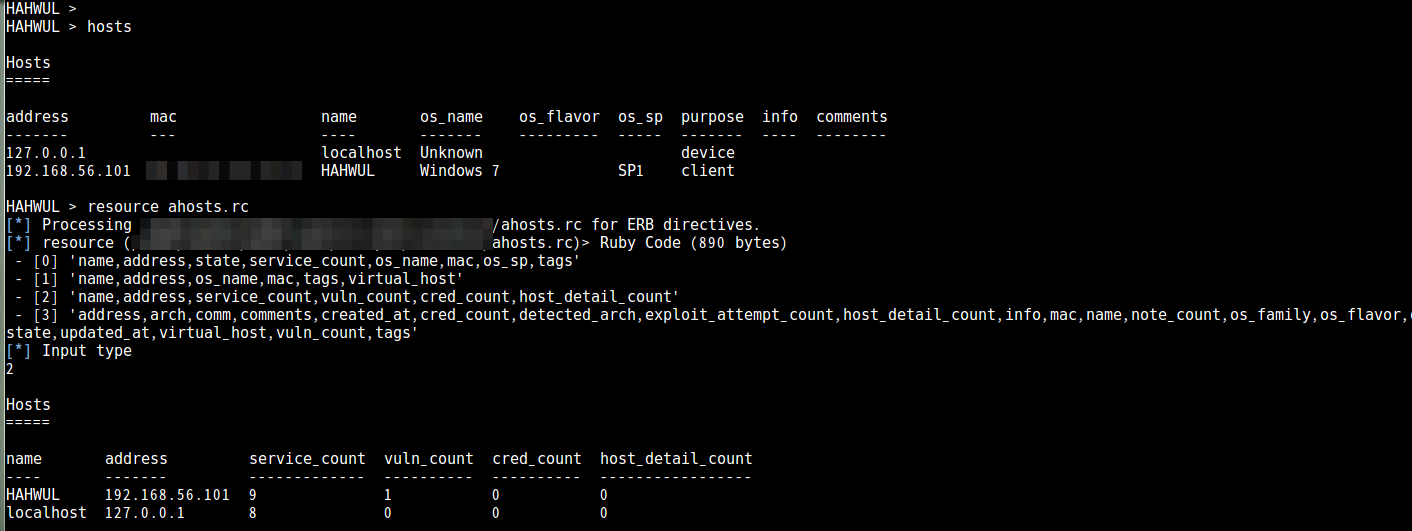
Metasploit에서 hosts 명령은 아주 중요한 명령입니다. 타겟에 대한 관리부터, exploit 시 좀 더 편하게 타겟을 RHOSTS에 넣을 수 있어 많이들 사용하시고, 앞으로도 쭉 사용할 수 밖에 없는 기능이죠.
오늘은 hosts 명령에서 열(column) 값을 custom 하고 tag 옵션을 이용해서 조금 더 효율적으로 관리하는 방법에 대해 이야기할까 합니다.
Custom column
보편적으로 -c 옵션은 hosts에서 원하는 column만 볼 수 있게 해주는 옵션입니다. 기본 hosts 명령을 날리면 아래와 같이 address, mac, name, os_name, os_flavor, os_sp, purpose, info, comments의 값들이 나타납니다. 그러나 실제로 hosts 가 지원하는 column의 갯수는 더 많습니다.
HAHWUL > hosts

Hosts
=====

address         mac                name    os_name    os_flavor  os_sp            purpose  info  comments
-------         ---                ----    -------    ---------  -----            -------  ----  --------
192.168.56.88                       Lee                                                           Lee
192.168.56.139                       Kim     Linux                 3.10.40-4192068  server         Kim
192.168.56.101  08:00:27:69:14:ff  HAHWUL  Windows 7             SP1              client
address, arch, comm, comments, created_at, cred_count, detected_arch, exploit_attempt_count, host_detail_count, info, mac, name, note_count, os_family, os_flavor, os_lang, os_name, os_sp, purpose, scope, service_count, state, updated_at, virtual_host, vuln_count, tags
그래서 원하는 column의 데이트를 보기 위해선 -c 옵션을 통해 원하는 값들을 넘겨주어야 합니다.
HAHWUL > hosts -c 'name,address,state,service_count,os_name,mac,os_sp'

Hosts
=====

name    address         state  service_count  os_name    mac                os_sp
----    -------         -----  -------------  -------    ---                -----
HAHWUL  192.168.56.101  alive  9              Windows 7  08:00:27:69:14:ff  SP1
Kim     192.168.56.139    alive  0              Linux                         3.10.40-4192068
Lee     192.168.56.88    alive  0
원하는 정보만 추려서 보기 굉장히 좋습니다. 그러나.. 매번 입력마다 -c 옵션으로 값을 넘겨주기는 매우 번거롭습니다. 자주쓰는거끼리 모아서 rc 파일로 만들어놓으면 좋습니다.
ahosts.rc
hosts -c 'name,address,state,service_count,os_name,mac,os_sp'
그래서 간단하게 하나 짜보면..
<ruby>

rtype = Array.new(4)
rtype[0] = "'name,address,state,service_count,os_name,mac,os_sp,tags'"
rtype[1] = "'name,address,os_name,mac,tags,virtual_host'"
rtype[2] = "'name,address,services_count,vuln_count,cred_count,host_detail_count'"
rtype[3] = "'address,arch,comm,comments,created_at,cred_count,detected_arch,exploit_attempt_count,host_detail_count,info,mac,name,note_count,os_family,os_flavor,os_lang,os_name,os_sp,purpose,scope,service_count,state,updated_at,virtual_host,vuln_count,tags'"

puts " - [0] #{rtype[0]}"
puts " - [1] #{rtype[1]}"
puts " - [2] #{rtype[2]}"
puts " - [3] #{rtype[3]}"

print_status "Input type"
typ = gets.chomp

case typ
when "0"
   self.run_single("hosts -c "+rtype[0])
when "1"
   self.run_single("hosts -c "+rtype[1])
when "2"
   self.run_single("hosts -c "+rtype[2])
when "3"
   self.run_single("hosts -c "+rtype[3])
else
   print_error "Wrong choice"
end
</ruby>

입맛에 맞게 바꿔써 쓰시면 좋을 것 같네요~
추가로 column들은 -O 옵션으로 정렬해서 보거나 -S 옵션으로 검색 시 유용합니다.
Tagging
hosts 명령에서 info, name, comment는 평소에도 많이 이용하던 것들인데, 오늘 tag에 대해 사용해보니 매력적인 친구라고 느꼈습니다. tag는 각 객체가 어떠한 속성, 값, 등 여러가지 것들을 표기해주기 아주 좋습니다.
hosts 명령의 -t 옵션으로 태그 지정이 가능합니다. 아래 간단하게 2개의 host에 대해 각각 tag를 지정합니다.
HAHWUL > hosts 192.168.56.88 -t "Admin_access_user"
HAHWUL > hosts 192.168.56.139 -t "DB_access_user"
나중에 권한별로 정리하기에 매우 유용하겠지요. 여기서 아까 위에서 이야기한 column을 건드려 tag 내용을 볼 수 있습니다. comment와 비슷하지만 약간 차이를 가집니다.
HAHWUL > hosts -c 'address,name,os_name,info,comments,tags'

Hosts
=====

address         name    os_name    info  comments  tags
-------         ----    -------    ----  --------  ----
192.168.56.88    Lee                      Lee       Admin_access_user
192.168.56.139    Kim     Linux            Kim       DB_access_user
192.168.56.101  HAHWUL  Windows 7
tag는 여러개 지정이 가능합니다. 아래와 같이 DB_access_user tag를 가진 host에 Admin_access_user tag를 붙여주면..
HAHWUL > hosts 192.168.56.139 -t "Admin_access_user"
HAHWUL > hosts -c 'address,name,os_name,info,comments,tags'

Hosts
=====

address         name    os_name    info  comments  tags
-------         ----    -------    ----  --------  ----
192.168.56.88    Lee                      Lee       Admin_access_user
192.168.56.139    Kim     Linux            Kim       Admin_access_user, DB_access_user
192.168.56.101  HAHWUL  Windows 7

Kim은 2개의 태그를 지니게 됩니다. 이 태그들로 검색 시 원하는 자료만 쏙 빼서 볼 수 있죠.

HAHWUL > hosts -S Admin_access_user

Hosts
=====

address       mac  name  os_name  os_flavor  os_sp            purpose  info  comments
-------       ---  ----  -------  ---------  -----            -------  ----  --------
192.168.56.88       Lee                                                       Lee
192.168.56.139       Kim   Linux               3.10.40-4192068  server         Kim
hosts의 -R옵션으로 로 데이터를 한번에 집어넣때 동일하게 -t 옵션 사용이 가능합니다. 물론 이건 다른 -R 옵션에서도 많이 쓰는 방법이니 바로 손에 익을 것 같네요.
hosts -R "192.168.56.100-192.168.56.121" -t Admin_access_user
태그를 지울땐 host를 지울때와 동일하게 -d 옵션을 주되, -t 를 같이 주어 삭제가 가능합니다.
HAHWUL > hosts -c 'name,address,state,service_count,os_name,mac,os_sp,tags'

Hosts
=====

name    address         state  service_count  os_name    mac                os_sp            tags
----    -------         -----  -------------  -------    ---                -----            ----
HAHWUL  192.168.56.101  alive  9              Windows 7  08:00:27:69:14:ff  SP1
Kim     192.168.56.139    alive  0              Linux                         3.10.40-4192068  Admin_access_user, DB_access_user
Lee     192.168.56.88    alive  0                                                             Admin_access_user

HAHWUL >
HAHWUL >
HAHWUL > hosts -d -t 'Admin_access_user' 192.168.56.139
HAHWUL > hosts -c 'name,address,state,service_count,os_name,mac,os_sp,tags'

Hosts
=====

name    address         state  service_count  os_name    mac                os_sp            tags
----    -------         -----  -------------  -------    ---                -----            ----
HAHWUL  192.168.56.101  alive  9              Windows 7  08:00:27:69:14:ff  SP1
Kim     192.168.56.139    alive  0              Linux                         3.10.40-4192068  DB_access_user
Lee     192.168.56.88    alive  0                                                             Admin_access_user
